With the correct expertise and supplies, homeowners like you can do basic do-it-yourself ceiling repair chores. Our tutorial will help you repair your ceiling without consulting a professional, from cracked ceiling repair to popcorn ceiling repair and plaster.
Ceilings in older homes may be composed of lath and plaster, although ceilings in newer homes are more likely to be made of plasterboard. It’s not difficult to repair little spots of damage on your ceiling, and the effort is definitely worth it-especially before you begin decorating a space.
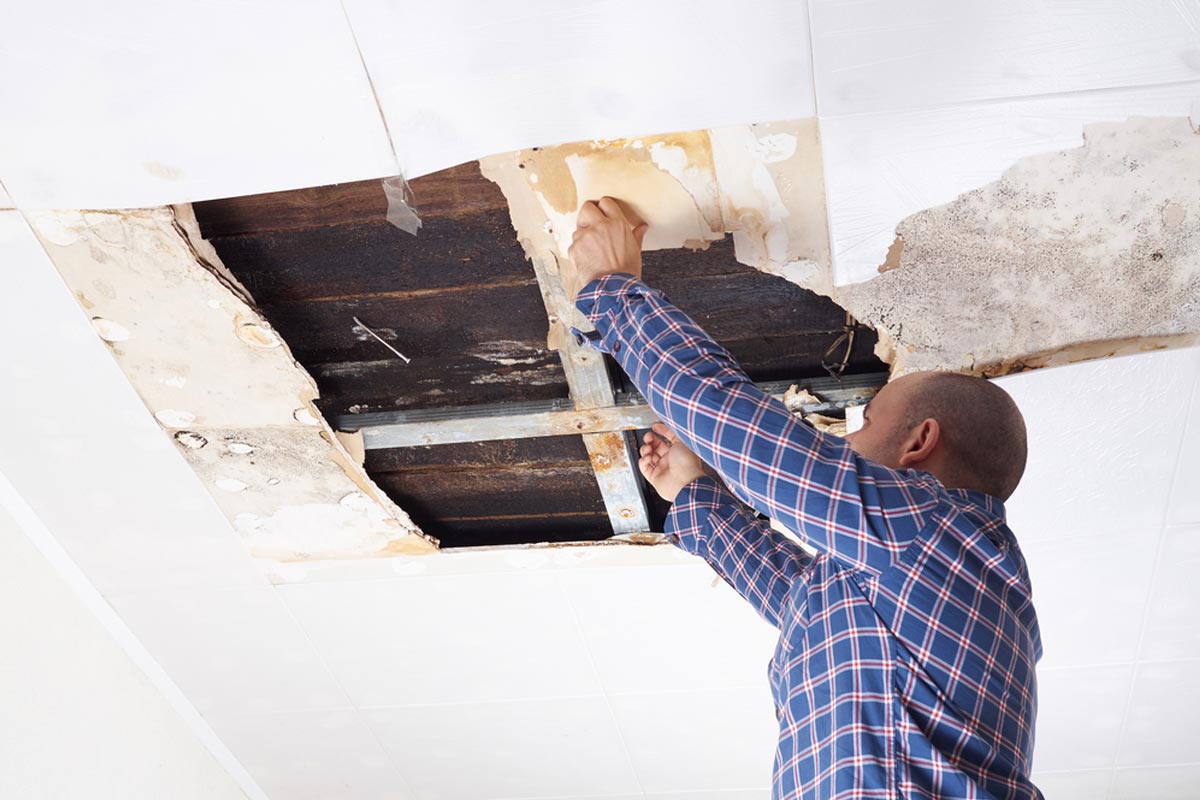
Ceiling Repair
To easily execute different ceiling repairs, follow these simple recommendations on a cracked ceiling repair, popcorn ceiling repair, and plaster below. These ideas will help you repair plaster, popcorn, and ceiling cracks. They’ll even assist you in removing a popcorn ceiling.
Repair any cracks.
- Remove any loose paint and drywall.
- Cover the crack with mesh tape.
- Smooth out the joint compound over the tape.
Related Articles: FOUNDATION INSPECTION: What To Expect From Structural Engineer Inspections
Popcorn Repair
- Screw screws into both sides of the stud where the nail is.
- Remove any damaged material and, if necessary, remove or replace the original screw.
- Apply joint compound to the screws.
Large Holes Cracked Ceiling Repair
- Draw a rectangle around the affected region.
- To add stability, place wooden cleats behind each side.
- Sew a patch piece onto the cleats.
- Apply mesh tape to the repair piece and spread the joint compound over it.
- Sand until smooth after applying a second and third coat of the compound over the repairs.
- Remove dust with a moist rag; prime and paint the ceiling to match.
Popcorn Ceiling Repair
Asbestos, also known as a “sleeping monster,” is prevalent in construction materials and does not pose an issue unless it is disturbed. It has the potential to become extremely poisonous, putting anyone who inhales it in danger of getting fatal diseases like mesothelioma.
If your popcorn ceilings are in good shape, they are unlikely to emit hazardous asbestos fibers. However, if you see the damage, you must act quickly. From cracked ceiling repair to popcorn ceiling repair and plaster, here are some pointers.
Popcorn Ceiling Repair With Water Damage
Do you want to know how to repair a popcorn ceiling that has moderate water damage? Then take the following actions.
#1. Set up the area
Check that the water leak has been stopped and cover your working space with a tarp or drop cloth. Cover all of the furniture, put some plastic around your light fixtures, or remove them. Prepare to make a sloppy mess.
#2. Dampen the area.
Fill a spray bottle halfway with warm water and moisten the textured area you want to erase. Wait around five minutes after spraying.
Related Articles: WHEN TO WALK AWAY FROM FOUNDATION ISSUES
#3. Remove the scraps
Hold the cardboard piece underneath the area you wish to scrape and scrape it with your putty knife. This will get rid of flaking, discolored, or loose ceiling pieces.
#4. Apply the primer.
Spray a special primer, such as Zinsser covers up ceiling paint & primer. This will prevent stains from forming on the water-damaged ceiling. Allow it to totally dry.
#5. Spray on the texture
Shake the spray texture can for several minutes. Keep the can nine to fourteen inches away from the ceiling.
Popcorn Ceiling Repair with a Hole
Small to medium-sized holes are actually rather straightforward to repair using these simple procedures.
#1. Locate the framing
Use a nail to probe the ceiling in order to locate the framework. Mark the frame, then cut between those two lines till you reach the framing. Then, along the sides, cut parallel to the framing.
#2. Patch the hole
Screw 34-inch cleats to the trusses’ sides. This will help to repair the vapor barrier and provide a foundation for the new drywall. Install a new piece of drywall with black drywall screws. Make sure they are somewhat inset into the drywall rather than jutting out. Otherwise, they may poke through the tape.
#3. Apply the texture
Allow the drywall repair to soak for a few minutes after wetting the edges. This will aid in its adhesion. Tape the joints with drywall tape and make sure they are neat and flat. Then, using your preferred texture application, apply it.
Popcorn Ceiling Repair Cost
In the United States, the average cost of supplies to repair a popcorn ceiling is $16.05 per patch, with prices ranging from $15.02 to $17.08. Each patch costs $339.89 in labor and materials, with prices ranging from $302 to $377.58. Your actual cost may differ based on where you live.
Related Articles: LANDLORD FRIENDLY STATES: Comprehensive List of the Best & Least Options In 2022
Cracked Ceiling Repair
While cracks in the ceiling can be disconcerting, not all cracks indicate major structural problems. Cracks in the ceiling are ubiquitous, and their influence is often more cosmetic than structural. Learn how to tell the difference between minor ceiling cracks and more problematic cracks that require quick attention. Discover how to repair a minor damaged ceiling from below without requiring substantial drywall work.
How to Repair Minor cracked ceiling
#1. Clear the ceiling crack
Pry off loose paint and drywall compound with the utility knife and five-in-one tool. Remove any old mesh or paper tape as well. Work with the crack lengthwise, not sideways.
#2. Spread joint compound
Spread the joint compound over the crack with the drywall knife. Also, spread out about 3 inches. Apply thinly.
#3. Apply tape
Tape the moist joint compound with paper tape. As much as possible, center the tape on the ceiling crack. Using the drywall knife, press the tape.
#4. Apply joint compound
Over the tape, apply a thin layer of joint compound. To hide the tape’s edges, feather out the edges.
#5. Touch up the joint compound.
Sand off any high places after the joint compound has been cured. Fill up any missing joint compound areas. A full second coat may be required. Allow drying before sanding to smooth.
#6. Paint and Prime
After the joint compound has cured, prime the area before applying ceiling paint that matches the existing ceiling paint.
How to Repair Large Cracked ceiling
#1. Clear attic
To repair major ceiling cracks, you must gain access to the attic. Typically, attic access doors are situated in bedroom closets, corridors, or garages. Use the flashlight, to locate the crack. Clear loose-fill insulation or fiberglass batt insulation.
Related Articles: HOW DOES AMTEX AUTO INSURANCE WORK? BEST REVIEWS IN 2022? IS IT THE CHEAPEST CAR INSURANCE IN TEXAS?
#2. Cut out cracked drywall
Cut out the region of the crack plus 1 to 2 inches beyond the crack with a drywall jab saw.
#3. Measure joists
Measure the distance between the joists before leaving the attic. The spacing should be 14 1/2 inches in most homes with joists spaced 16 inches on center.
#4. Make a plywood backer board
Below, cut 1/2-inch plywood 14 1/2 inches wide by the length of the hole you created in the drywall plus 3 or 4 inches extra on both ends, up to 8 feet. Add extra plywood if necessary.
#5. Cut drywall replacement section
To match the thickness of the existing drywall, cut out 1/2-inch or 5/8-inch drywall with a utility knife. Cut a piece to fit the cutout in the ceiling.
#6. Place plywood backer board
Place the plywood backer board in the attic above the cut-out section. Before you go downstairs, temporarily place a hefty item on the board. While you drill from below, the hefty item will hold the plywood in place.
#7. Attach the replacement section
Screw the drywall replacement part onto the plywood from below using drywall screws. At each end, put in more screws through the existing drywall and into the extra plywood backer.
#8. Finish and paint
Finish the repaired section’s edges with drywall tape. Cover the edges with joint compound. Sand. Apply primer to the patch, then paint it to match the color of the ceiling.
Plaster Ceiling Repair
It is feasible to repair a cracked and delaminating plaster ceiling with current materials and a classic approach. Here’s how to repair the plaster ceiling in your old house, step by step.
#1. Sizing up plaster ceilings
After repairing whatever caused the ceiling to leak in the first place (leaky roof, structural changes), the next step is to determine how far the ceiling has pulled away. Gently push on the surface to assess the degree of movement between the plaster and the lath. Hopefully, you will feel it return to its original position, like a jigsaw puzzle piece slipping into its own distinctive location.
#2. Clear the debris
Reattachment is unlikely unless you can suck away all of the dirt from above. We frequently discover that the worst part of the ceiling has too much debris, and we must remove this section, reconnect the edges, and then fill the gaps with new plaster. Soft and crumbly plaster will not hold up throughout the pushing and drilling and must be removed.
#3. Locate the wood laths
To allow the adhesive to adhere to something solid, the holes you bore to inject the adhesive must be directly beneath the wood lath rather than in the intervals between the lath. You can see the placement of the lath if you have removed any plaster or dug out a fissure for repair. Finding lath in a reattachment-only repair, on the other hand, is essentially a hunt-and-peck operation. You can sometimes stand back and look for ghosts or shadows of the lath showing through the final layer if the plaster is not too thick.
Related Articles: IS MERCHANTS INSURANCE A PERSONAL OR BUSINESS INSURANCE? BEST REVIEWS IN 2022
#4. Create injection holes
A 1/4 inch carbide drill bit was used to bore injection holes. Making these holes is a second issue because it is critical to only drill through the injection surface. For example, if you’re reattaching from the plaster side, you must bore all the way through the plaster but stop before reaching the wood lath.
#5. Vacuum again.
You must vacuum out the debris and drilling dust after boring your injection holes. Because older plaster is delicate, take care not to vacuum it off the ceiling! Place one hand near the hole to gently support the plaster while the other hand vacuums. However, do not reposition the plaster; the emptiness will allow the vacuum to draw some of the particles out through the hole.
#6. Inject the adhesive
Finally, the adhesive is injected. We utilize a latex compound that is water-based and acts as a vinyl floor adhesive. However, any high-quality latex or acrylic adhesive would suffice (for example, Liquid Nails or floor adhesive). These products are available in caulking tubes for minor tasks and five-gallon pails for larger jobs at building supply companies and hardware stores.
#7. Secure the plaster with forms
We press the plaster back into position against the lath and attach it using forms after injecting glue into the repair region. This phase spreads the adhesive, allowing it to adhere to a larger surface area.
#8. Shores vs. Screws
Screws save time and keep the work area clear, but they might harm the plaster and leave additional holes to repair later. Shores are better suited to fragile, decorative, or museum-quality plaster, and they are used for both plaster-side and lath-side reattachment.
#9. Take out the forms
The forms can be removed the following day. Scrape off any plastic that has stuck to the adhesive injected from the plaster side with a putty knife. The adhesive is still soft around the holes at this time, but it has hardened sufficiently to allow the forms to be removed. Scrape off the dried glue residue with a drywall or putty knife on the plaster side, then carefully scallop out the excess adhesive showing from the hole with the corner of a putty knife.
#10. Fill injection and screw holes
The adhesive will further retreat into the hole as it dries over the next day or so (depending on heat and humidity), leaving a clear gap to fill. We normally fill the injection and screw holes with Durabond 45 (sandable), blended to the consistency of peanut butter, because it sets up quickly and dries very rigid with minimal shrinkage.
Conclusion
This post should have given you some confidence that you can DIY everything from cracked ceiling repair to popcorn ceiling repair and plaster.
Related Articles: CLOUD ON TITLE: What It Is And How To Remove It
If you’re still worried about doing it yourself, try getting support on Patreon, where readers help them with old house repairs ranging from cracked ceiling repair to popcorn ceiling repair and plaster. You can determine what amount of assistance you require, and let’s get started!
Frequently Asked Questions
How much does it cost to patch a ceiling?
The typical cost of repairing a drywall ceiling is from $320 to $1,300. A basic ceiling patch job will cost between $65 and $90 per hour to complete. Materials and supplies for a simple patch, including tape, fasteners, and mud, may cost roughly $30.
How much does it cost to replace old ceiling?
A ceiling replacement costs between $1.50 and $3.25 per square foot on average.
Can you repair part of a ceiling?
If only a tiny portion of your ceiling is damaged, you can do a quick repair with a plasterboard patch utilizing dry-lining procedures that do not require plastering expertise. Alternatively, it may be easier to plasterboard the entire ceiling. Wear safety eyewear and a dust mask at all times.
How hard is it to replace a ceiling?
It will take some time and work to replace your ceiling drywall, but it isn’t difficult if you have the necessary tools and materials. Clear the room, the walls, and the attic, if one exists above the ceiling. Remove the insulation and set it aside to be replaced later.
Will ceiling dry out after leak?
The time required to dry out the ceiling will vary depending on how wet it became. It can take as little as two weeks and as much as four weeks.
Related Articles: