Linoleum is making a comeback, so if you have a bedroom or sunroom that could use a facelift, this trendy floor material is a good option. It can last for about 40 years with proper installation, and there are many types of linoleum to choose from to fit your aesthetic without looking like your floors belong in your grandparents’ house.
However, before you cover your existing floors with linoleum, learn how to install linoleum flooring on bathroom concrete, from proper prep work to a secure sealant.
What is Linoleum Flooring?
Linoleum flooring is made of canvas, linseed oil, powdered cork, pine resin, and mineral fillers. This material typically comes in sheets that a pro will need to cut to fit a room properly. A flooring adhesive is then used to adhere the flooring material to the underlayment or existing flooring in a room.
Because of its lower cost compared to other flooring materials and its anti-microbial and biodegradable properties, real linoleum is a popular choice for upgrading a room.
How to Install Linoleum Flooring On Concrete
Do-it-yourself homeowners save big on home improvement projects by doing the work themselves, such as how to install new linoleum flooring on concrete in a bathroom. They typically pry off the baseboard, remove the old flooring, and clean the slab or subfloor.
While it is often easier to remove the toilet to avoid trimming the new flooring around the toilet’s base, an experienced do-it-yourselfer can install linoleum flooring on your bathroom concrete while the toilet is still in place. This is done by first making a template with 15-pound roofing paper as a guide for cutting the linoleum.
You can install linoleum flooring on your bathroom concrete floor, and we’re here to assist you. Here’s what you’ll need to get started.
Tools Needed
- Tape measure
- Level
- Hammer or pry bar
- Screwdriver
- Utility knife
- Notched trowel
- Floor roller
Materials Needed
- Linoleum
- Marking paper/tape measure
- Pencil or marker
- Flooring adhesive
- Linoleum sealant
- Caulk
Creating a Template
- Draw a floor plan of the bathroom from above, as if looking down from the ceiling. Draw the walls, including the doorway and any offsets. Outline a vanity cabinet, a tub or shower, and an elongated oval for the toilet.
- Measure each section of the walls, the distance between the walls and the sides and front edge of a vanity cabinet, and the width and depth of any offsets. Measure the distance between the front edge of a tub or shower and a wall on the floor. Include the doorway’s width.
- Measure and make a note of the distance between the back of the toilet’s base and the wall. Measure and note the width of the floor between the base’s sides and a wall, cabinet, tub, or shower. Take note of the base measurement from front to back.
- Measure the bathroom’s longest side. Using a wood or metal straightedge and a utility knife, roll out 15-pound roofing paper on a flat surface and cut two sheets 12 inches longer than the longest measurement.
- Transfer the measurements from the floorplan onto the template, using the basic template’s outer edge as a guide.
- Transfer to the template the measurement for the location and size of the toilet’s base. Slit the paper from the back edge of the toilet’s base to the edge that represents the wall behind the toilet.
- Lay the template out on the bathroom floor in the manner in which it was measured and cut.
- Using the rounded tip of the utility knife, contour the template around the base of the toilet.
The Installation Procedure
#1. Clear your subfloor of any obstructions.
First and foremost, you must expose your subfloor. Remove any furniture or obstructions from the room you’re working on, as well as any baseboards that may be in the way. These can be reinstalled later. If you’re going to cover old tiles with linoleum, make sure they’re clean and ready for leveling.
#2. Tidy up
Linoleum does not require an underlay, making installation much easier. This, however, also means that any bumps in the subfloor will be very noticeable. As a result, your subfloor must be completely level and dirt-free before you begin.
If you want to cover an old floor, you must first ensure that it is completely flat. Tiles will require grout reapplication (with at least 48 hours of drying time), and concrete will require repair to ensure that moisture cannot seep through. A masonry chisel can be used to level any high spots. A hammer should be used to remove any adhesive residue from an existing vinyl or linoleum floor.
If you’re having trouble getting your subfloor completely flat, consider adding a plywood underlay to support the linoleum. Simply cut the wood to size first.
#3. Let your linoleum get used to the environment
It’s critical to acclimate your linoleum after preparing the subfloor. Because of its natural properties, the material shrinks and expands with temperature. These modifications will not affect the appearance of the floor over time, but they may cause problems during installation. Allow the material to reach its “resting” size by storing it in the intended room for at least 24 hours before use. Allow it to rest on a level surface without stacking.
#4. Create a template.
Making a paper template is the simplest method for measuring linoleum. Take your removed baseboards into consideration when installing tiles or sheets. When you reinstall the baseboards, you should leave at least a 1/4-inch expansion gap between them.
#5. Draw cutting lines on the linoleum.
Transfer the paper template to your linoleum after you’ve finished it, and mark out where you’ll cut. To trace around the paper, we recommend using a chalk line or a washable marker. Alternatively, you can take precise measurements and draw out your shape with a long ruler and tape measure. When laying tiles, you can use the same template and marking process on a smaller scale to place the flooring’s edges.
Remember that linoleum flooring can be easily cut down but cannot be added to, so make the marking slightly generous; about an inch wider should suffice.
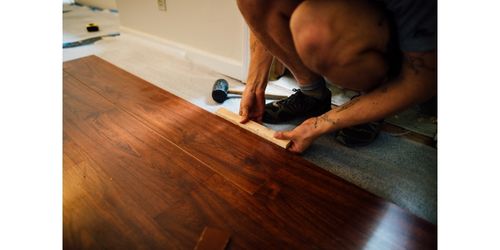
#6. Trim the linoleum
Now that you’ve marked out your linoleum, you can start cutting, and precision is essential. To cut along the lines, use a sharp utility knife or a hooked linoleum knife. To ensure an accurate cut, use a safety straightedge. Place a layer of plywood underneath the material as you cut to protect the subfloor.
After placing the linoleum piece, work the flooring around any corners and obstructions, being careful not to crease it. If you mark and cut your linoleum with an extra inch or two on each side, the material will lay up against the walls.
#7. Fine-tune your cut
To make the linoleum lay flat on the floor and flush against all edges, use your cutting tool to trim the edges. You can create the linoleum with a piece of wood for square corners. To shave material from inside and outside corners, use V-shaped cuts. Do this with extra care to avoid taking too much off.
#8. Apply adhesive
You must consult the manufacturer for the recommended adhesive before installing linoleum sheets or tiles.
Peel back the material and spread the adhesive on the underside of the linoleum with a notched trowel to apply. Again, depending on the manufacturer, this step may have specific instructions. for example, Some types will only require glue on the edges, whereas others will require adhesive all over. Before rolling the linoleum back down and pressing it into place, allow the material to sit for a few moments. Repeat this process for the rest of the floor.
#9. Secure the linoleum using a roller.
After successfully gluing down the sheet or tile flooring, use a roller to remove air bubbles and secure the flooring to the subfloor. Working from the center of the room outward, ensure that every part has been pressed. You may notice excess adhesive seeping out of the edges; this can be dissolved with a solvent and wet rag.
#10. Finish with a linoleum sealant
To give your linoleum flooring a protective layer, most manufacturers recommend sealing it. Use a brush or roller to apply a thin, even coat of sealant to the entire floor. Make sure to seal any seams to prevent peeling or water damage.
#11. Allow it to sit for at least 24 hours.
Now is the time for your flooring to mold, so stay away from it for at least 24 hours. This gives the adhesive and sealant time to dry. Reduce traffic until the underlying adhesive has completely set. If you replace your furniture too soon or walk too much on the floor, the still-pliable base will deform as it dries, resulting in permanent bumps and divots.
How to Care for a Linoleum Floor
Linoleum is slightly porous because it is a natural substance. While it has a history of marine use and water resistance, it is not impervious to damage. This material, like hardwood and laminate flooring, is especially susceptible to standing water and pet accidents, so clean up spills quickly and avoid using too much liquid when mopping.
A damp mop dipped in a pH-neutral cleaning solution and thoroughly wrung is the best method for maintaining this flooring. You can also wet the floor directly in front of your mop by filling a spray bottle with a 50/50 solution of vinegar and water. Scuffs should not be removed with ammonia-based cleaners as they will strip the linoleum.
While you should avoid this practice if you have vinyl, you should wax linoleum on a regular basis to keep it shiny. Try putting a little fabric softener in the water when cleaning the floor in between wax treatments. It can make the shine more intense.
Does linoleum need to be glued down?
Linoleum is installed with adhesive, but depending on the smoothness of the underlayment or floor beneath, you may only need to glue around the perimeter of the backside of the linoleum sheets, or you may need to glue all the way around the backside of the linoleum sheets.
What do you put under linoleum flooring?
A plywood underlayment is ideal for linoleum, but a standard, sturdy underlayment will suffice. What exactly is this? Plywood is easy to lay over the subfloor and easy to apply adhesive before laying the linoleum.
What is the easiest way to install linoleum flooring?
Here is the easiest way to install Linoleum Flooring:
- Measure the space.
- Allow Linoleum to Warm Up.
- Take down any furniture, baseboards, appliances, or doors.
- Repair and level the current floor.
- Draw and cut lines on the linoleum.
- Cut Linoleum.
- Lay Linoleum.
- Roll the linoleum and seal it.
What kind of adhesive to use on linoleum?
ROBERTS 2072 is a superior, commercial-grade adhesive designed specifically for the installation of linoleum flooring. This adhesive is designed to grab and hold stiff linoleum floors in place with immediate strength.
How do you stick the linoleum down?
Start by applying flooring adhesive with a notched trowel to the subfloor or existing floor. A home improvement or hardware store will have flooring adhesive and a notched trowel. Before installing the linoleum flooring, apply a thin, even coat of flooring adhesive.
Can you put linoleum on a cement floor?
Yes. However, in order to protect linoleum flooring from moisture, you will need an underlay in the form of a thin vapor barrier when installing it on concrete. To install your underlay, measure how much you need and cut it into strips, leaving at least 5cm extra for expansion.
Related Articles
FAKE INSURANCE CARD: How To Make One With Templates
COMMERCIAL RENT TAX (CRT) NYC: Return Dates for 2023
FLOORING CONTRACTORS: Licence & Guide on How To Hire One